What do all Microcontrollers (MCU) have in common?
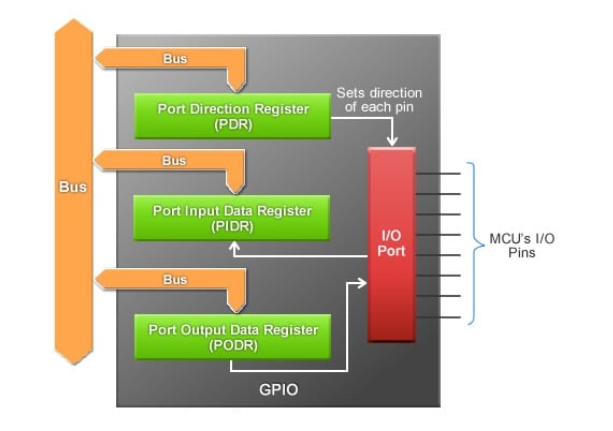
They have pins. The pins are those that stick out of the IC chip. Each pin has a specific function or task, but sometimes the pins are just used for general purpose input or output depending on our requirement. These pins are internally associated with registers (more than one for each pin), but it is not necessary that all pins will have registers. Some pins such as the VCC or GND or the CLK and RESET pins (assuming they are not dual use pins) don’t have any associated registers and usually every Input Output (IO) pin is associated with several registers.
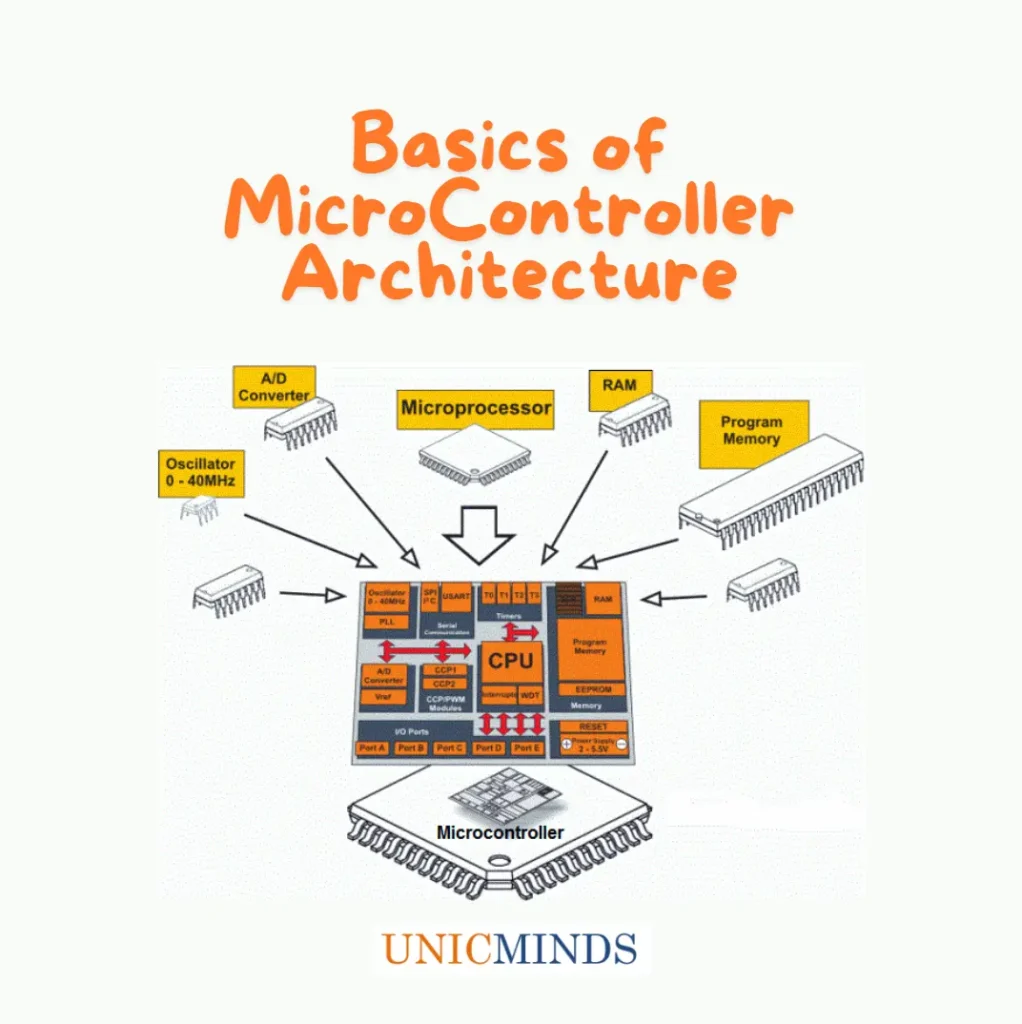
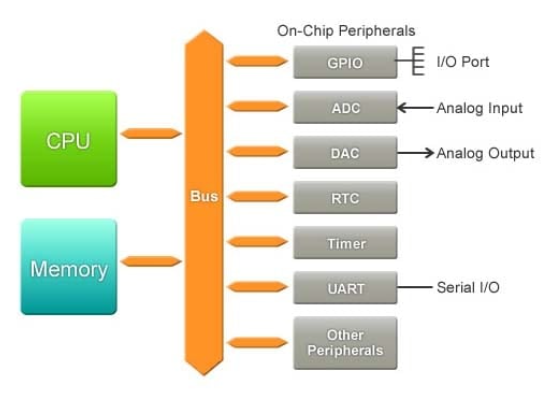
Every microcontroller board will have the below model of the main chip, RAM memory, flash and ROM memory, I/O pins, power pins, serial ports, timers and signal generators, and other peripherals.


There are many microcontrollers starting from 8051 to 8096 to Renesas and ATMEGA328P. ATMEGA328P is the name of the microcontroller used on the Arduino printed circuit board. Every microcontroller(MCU) will have operating voltages at which it can do different types of work. The ATMEGA328P is designed to work at two different levels 3.3V for low power consumption and 5V-16V for high power consumption such as mechanical motors and drivers.
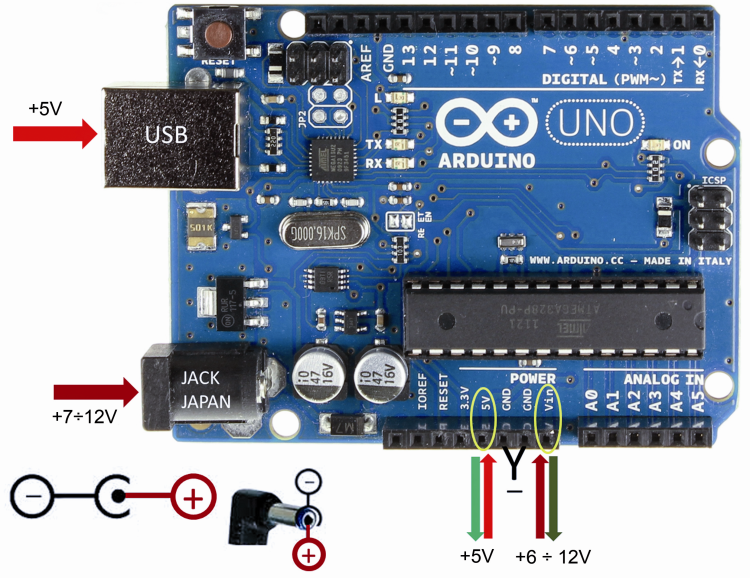
You can power the Arduino board in multiple ways as shown below. You can use the USB to power the board with 5V or you can use the barrel jack below to provide more voltage around 7-12V if you want to run motors and beyond. Similarly, you can provide 5V directly to the pin or you can use that same pin to connect and get 5V to power a breadboard or other element. You can use Vin 6-12V to provide more power or draw more power to run motors or beyond (Do not provide less than 6V at Vin). These are the various options of power input output available. You can use the Vin pin to provide 6-12V to your board. Very practical when you need to use an external power source and connect it directly to your board. And, as you can guess, if you use the Vin, you also need to use the ground correctly, by connecting it to the ground of the external power source. Note that the USB and DC power jack already have the ground integrated and which connects to anything you plug on them. In fact, the metal part that you can touch around the USB connector is directly linked to the ground!
Every microcontroller (MCU) has power pins and we need to know the operating voltage of the board. Microcontrollers usually must have low-power requirements since many devices they control are battery-operated. There will be Input & Output PINs, for example, on the Arduino Uno we have 14 digital pins that are bi-directional both input and output and analog pins are only analog input pins. Then, every MCU will need to have Clock, Analog to Digital Converter, Input and Output connections, communication connections, Vin pin, Reset pin, USB jack to dump the code from your system, power jack – for more than 5V for running robots with 12V batteries. Finally, it will have a chip which is the brain of the microcontroller board.
Each microcontroller is different in its design and will have a different set of pins. But, there are some fundamental commonalities between all microcontrollers depending on the purpose for which it is designed. We need a microcontroller to
- Receive digital input, so we need to have digital input pins on the microcontroller
- Send digital output, so we need to have digital output pins on the microcontroller
- We need to first understand how to make a pin input pin or output pin on a particular microcontroller and how to use the designated input and output pins.
- I/O pins will have registers associated internally and the bus connections
- Receive analog input – input pins to receive analog input in voltage form
- Send analog output – Arduino doesn’t have analog output pins, it is the digital output 0 to 255 that is converted into analog using pulse width modulator (PWM).

- Then, we need to focus on understanding the peripheral pins
- We can then try to understand peripheral pins such as UART, I2C, and SPI
- A microcontroller needs memory to work like a mini computer. The most common types of memory present on the microcontroller are: RAM, ROM, and EEPROM. The amount of memory required of each of these types depends on the quantity of work required by the microcontroller for which it is mainly designed.
- Power Pins – You generally see a lot of power pins such as 5V, 3.3V, Vcc, Vdd, Vin and more.

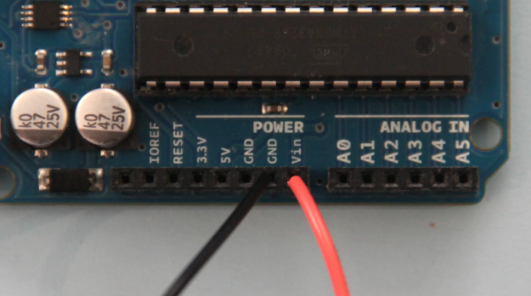
You can connect the positive end of your battery pack to the Vin on Arduino and the negative end of your battery pack to the GND.
- Ground Pin – There are several GND pins on the Arduino, any of which can be used to ground your circuit. General Output pins cannot be used as Ground. Digital or analog output pin cannot be used as GND. For a given project it can be used with the LOW which is very close to the GND value.
- Clock Pin – to execute a scheduled command via the I/O pins or the pin to toggle once the data pin is set to the correct value
- Analog to Digital Converter – we need to have an analog to digital converter from the analog pins (at the bottom of the board below) to the digital output pins (at the top of the board below).
- Digital to Analog Converter – there is no D to A converter on Arduino but other boards may have it. In Arduino Uno, the D to A is managed via Pulse Width Modulation on Digital Output Pins itself.
Powering the Arduino Board
There are three ways to power the Arduino Board – via the USB port, DC Barrel plug, and the Vin Pin. You can also use the 5V pin with an external regulated 5V power supply. It can be a wall adapter that gives out constant 5V or a DC-DC converter that is connected to a battery or a set of batteries.You can use both the 5V pin and the 3.3V pin to provide power to modules that are connected to the Arduino. But you can’t use the 3.3V pin to power your Arduino Uno/Nano.

Hope this is a useful intro to the basics of microcontroller boards. Thank you.
You may like to read: Microbit Programs – Dice, Bird Sounds, & Stop Watch, Motion Blocks in Scratch Programming, & What is Coding for Kids?