This post was originally posted on all3dp.com.
3D printing involves several stages, from designing your model to preparing it for printing and finally executing the print. You’ll need various software solutions, including CAD programs to design models, a slicer to convert those designs into G-code, and firmware to control your printer’s operations.
CAD Software
Computer-aided design (CAD) software is essential for creating detailed 3D models. There are many options out there, with a few standouts if you’re getting started.
Tinkercad is a free, web-based CAD software by Autodesk. It’s highly accessible and user-friendly, making it ideal for you if you’re a beginner or using it for educational purposes.
SketchUp Free is known for its simplicity and ease of use. You can start with basic geometric shapes and modify them to create detailed 3D models. Plus, it includes a vast library of pre-made models in the 3D Warehouse that you can integrate into your designs.
And Fusion 360, developed by Autodesk, is a comprehensive CAD, CAM, and CAE tool. This cloud-based software is suitable for you if you’re an advanced user, offering extensive tools for parametric modeling, mesh modeling, and generative design.
Slicer Software
Slicer software converts your 3D models into instructions that your 3D printer can understand. There are plenty of options depending on what you’re after. Developed by UltiMaker, Cura is a free, open-source slicer that supports a wide range of 3D printers and offers a user-friendly interface. You can extensively customize print settings, and it includes features like adaptive layers and a variety of support options.
Originally based on Slic3r, PrusaSlicer is developed by Prusa Research. It offers advanced features and is optimized for Prusa 3D printers, but you can use it with other printers as well. Its detailed settings and advanced features make it suitable for both beginners and experienced users.
Simplify3D is a premium slicer software known for its detailed control over print settings and high-quality support structures. While it’s not free, many users might find the investment worthwhile due to its comprehensive features and ability to optimize print quality and efficiency.
Slicer Software – Prusa

PrusaSlicer boasts a user-friendly interface with an intuitive layout. Its clean design and icon-driven UI make it easy to navigate and access the various settings. The software offers a range of customization options, allowing you to adjust parameters such as layer height, infill density, print speed, and support structures.
One standout feature of PrusaSlicer is its support for variable layer height. This feature enables you to print different sections of your model with varying layer heights, resulting in smoother contours and finer details. Additionally, PrusaSlicer offers 17 different infill patterns to choose from, giving you greater control over the internal structure of your prints.
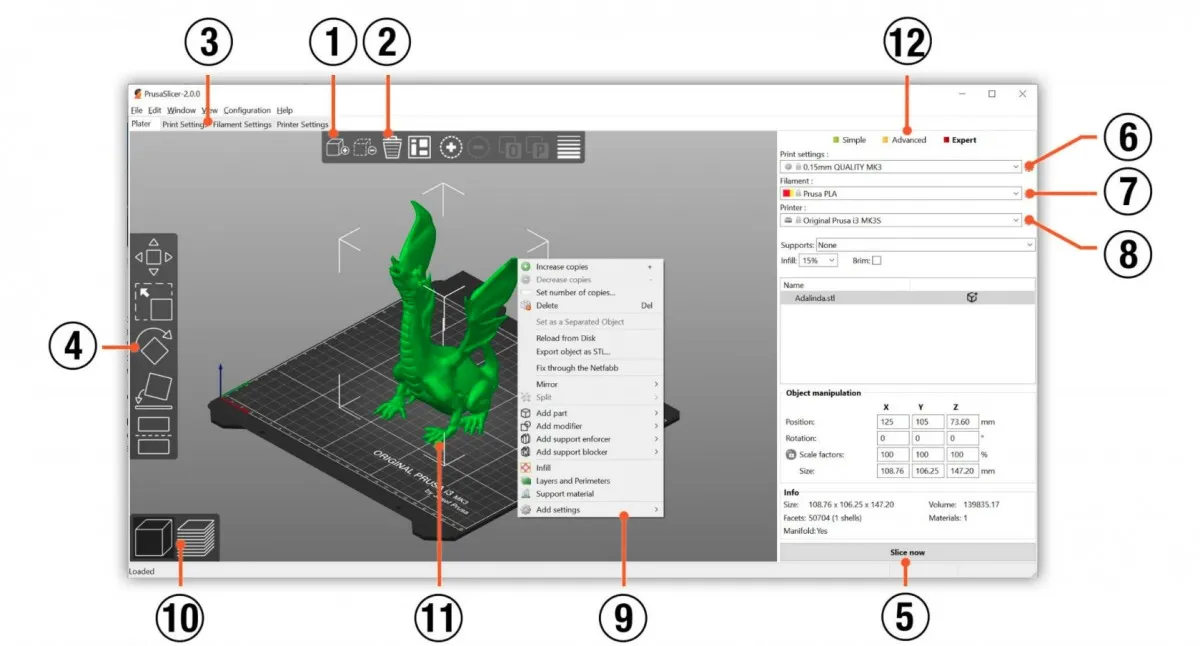
UI overview of PrusaSlicer:
1. The Add button loads models into PrusaSlicer2. Delete and Delete All buttons remove the model(s) from PrusaSlicer
3. Opens detailed settings of print, filament and printer
4. Move, Scale, Rotate, Place on Face and Cut tools
5. Slice and generate G-code button
6. Quality / Speed setting of a print
7. Material selection
8. Printer selection
9. Right-click on model opens a context menu
10. Switch between 3D editor and layers preview
11. Model preview
12. Switch between Simple / Advanced / Expert mode
Pros and Cons of PrusaSlicer:
Pros:
- Works seamlessly with Prusa printers
- Frequent updates and ongoing development
- Variable layer height for enhanced print quality
- Lightweight installation and faster file processing
- Intuitive support generation using the “Paint-on” function
- Free and open-source
Cons:
- Limited customization options compared to other slicers
- Support and documentation may not be as robust as some competitors
Cura: Versatile and User-Friendly
Cura is another popular slicer software widely used in the 3D printing community. Developed by Ultimaker, Cura is known for its user-friendly interface and versatility. It was initially created as a slicing software for the Ultimaker Original 3D printer and has since evolved into a powerful tool compatible with various 3D printer models.
User Interface and Features
Cura features a drop-down menu-based interface, keeping the main window clutter-free. The software offers a wide range of printer and material profiles, making it easy to find the right settings for your specific setup. Cura also includes advanced features like gap-free toolpaths and integration with major CAD platforms such as Solidworks and Autodesk Inventor.
One notable feature of Cura is the Cura Marketplace, which provides access to a variety of plugins. These plugins enhance the functionality of the software, allowing you to expand its capabilities and customize your printing experience. The marketplace offers plugins for tasks like calibration tests, temperature towers, and more.
UI overview of Cura:
1. Open file2. Printer selection panel
3. Configuration panel
4. Stages
5. Print settings panel
6. Marketplace
7. App switcher
8. UltiMaker account
9. Action panel
10. Save or share file
11. Preview
12. Camera position tool
13. Model information
14. Adjustment tools
Pros and Cons of Cura
Pros:
- Advanced engine and gap-free toolpaths
- Integration with major CAD platforms
- Rich library of printer and material profiles
- Cura Marketplace for additional plugins
- Free and open-source
Cons:
- Slow slicing for large or complex models
- Certain features only available in the paid version
- Limited customization options in the user interface
- Internet connection required for some features
Firmware
Firmware runs on your 3D printer’s control board, managing its operations.
Marlin is arguably the most widely used firmware for 3D printers. It’s open source and highly customizable, supporting a vast range of features and hardware configurations. Marlin provides features like auto-bed leveling, thermal protection, and advanced motion control.
Klipper uses a host-based approach, relying on a single-board computer (like a Raspberry Pi) to perform the complex calculations required for 3D printing, offloading the work from the printer’s control board. This setup allows for smoother and faster prints. Klipper supports features like pressure advance, input shaping, and multi-microcontroller configurations.
Repetier-Firmware is known for its efficiency and advanced features. It supports multiple extruders, various bed leveling methods, and detailed print settings. Repetier-Firmware is optimized for high-speed printing and provides extensive customization options, making it suitable for both beginners and advanced users like you.
Making 3D Printing Files
- Acquire or develop a 3D model of an item you want to print. Make sure it has wall thicknesses that are suited to the printing process. Check if it has no disjoints or faults that might cause the slicing to fail. Additionally, review if the size of the object is suited to the printer you are using.
- Use the design software or a file converter with the right capabilities, to create one of the common file formats accepted by the slicer you intend to use. Commonly used communication formats to upload to slicer software are STL, OBJ, and VRML. Not all slicers can access all file types. Ensure that the resolution of the generated communication file is appropriate to the resolution of the printer and the complexity of the part you’re printing.
- Upload this communication file to the slicer software you’re intending to use. Perform the slicing operation, making sure that settings such as scale, orientation, and slice thickness have been set appropriately.
- Upload the resulting sliced file as a machine instruction file—generally in one of the G-code formats—via Wi-Fi, USB, and SD Card.
- Print the part by setting the printer to complete the task, according to the uploaded G-code file.
Hope this is useful, thank you.
You may like to read: Printing Your Toys with ToyBox 3D Printer, How Transistors Become the CPU?, & Should Kids Learn Coding?
Source of this post: all3dp.com
